Reversed-Z in OpenGL
Maybe you’ve heard of Reversed-Z:
- http://dev.theomader.com/depth-precision/
- http://www.humus.name/Articles/Persson_CreatingVastGameWorlds.pdf
- http://outerra.blogspot.ca/2012/11/maximizing-depth-buffer-range-and.html
- http://www.geometry.caltech.edu/pubs/UD12.pdf
- https://developer.nvidia.com/content/depth-precision-visualized
It’s a pretty good way to get more precision out of your depth buffer. Very useful for games with long view distances, like for example Just Cause 2 (as shown in a link above).
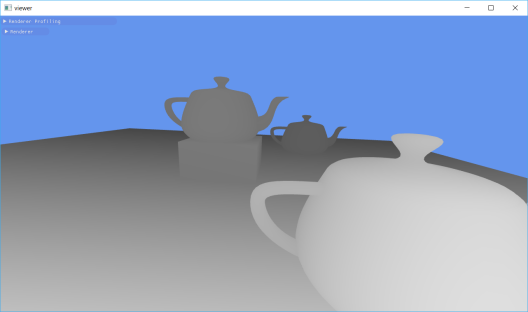
Reversed-Z visualized: Near objects have a higher Z value than far objects.
So, how to use it in OpenGL? Here’s a no-nonsense step-by-step guide.
Step One: Set Clip Space Conventions
Reversed-Z is designed for clip-space Z values in the range [0,1], not [-1,+1]. OpenGL’s default convention is [-1,+1], but you can override that using glClipControl:
glClipControl(GL_LOWER_LEFT, GL_ZERO_TO_ONE);
I recommend sticking this line of code at the start of your program, and never changing the clip conventions after that. Give up entirely on the [-1,+1] convention, it’s hands-down objectively worse than the [0,1] convention when it comes to precision. It’s a good decision even if you’re not using Reversed-Z. Anyways, when you sample from a depth texture in OpenGL, you already get a value between 0 and 1… so switching to the [0,1] convention for clip coordinates will make everything more consistent.
glClipControl is an OpenGL 4.5 feature. If you don’t have OpenGL 4.5, it might still be available as an extension (see: hardware supporting GL_ARB_clip_control). Therefore, you could use something like the following code snippet:
GLint major, minor;
glGetIntegerv(GL_MAJOR_VERSION, &major);
glGetIntegerv(GL_MINOR_VERSION, &minor);
if ((major > 4 || (major == 4 && minor >= 5)) ||
    SDL_GL_ExtensionSupported("GL_ARB_clip_control"))
{
    glClipControl(GL_LOWER_LEFT, GL_ZERO_TO_ONE);
}
else
{
    fprintf(stderr, "glClipControl required, sorry.\n");
    exit(1);
}
Step Two: Create a Floating Point Depth Buffer
The whole Reversed-Z thing is designed for floating point depth, not fixed point. That means you should be using a floating point depth buffer.
You can follow the FBO setup code below as an example:
int width = 640, height = 480;
GLuint color, depth, fbo;

glGenTextures(1, &color);
glBindTexture(GL_TEXTURE_2D, color);
glTexStorage2D(GL_TEXTURE_2D, 1, GL_SRGB8_ALPHA8, width, height);
glBindTexture(GL_TEXTURE_2D, 0);

glGenTextures(1, &depth);
glBindTexture(GL_TEXTURE_2D, depth);
glTexStorage2D(GL_TEXTURE_2D, 1, GL_DEPTH_COMPONENT32F, width, height);
glBindTexture(GL_TEXTURE_2D, 0);

glGenFramebuffers(1, &fbo);
glBindFramebuffer(GL_FRAMEBUFFER, fbo);
glFramebufferTexture2D(GL_FRAMEBUFFER, GL_COLOR_ATTACHMENT0, GL_TEXTURE_2D, color, 0);
glFramebufferTexture2D(GL_FRAMEBUFFER, GL_DEPTH_ATTACHMENT, GL_TEXTURE_2D, depth, 0);
GLenum status = glCheckFramebufferStatus(GL_FRAMEBUFFER);
if (status != GL_FRAMEBUFFER_COMPLETE) {
    fprintf(stderr, "glCheckFramebufferStatus: %x\n", status);
}
glBindFramebuffer(GL_FRAMEBUFFER, 0);
Side tip: Copying a Framebuffer to a Window
If you didn’t know, you don’t need to create a depth buffer when you create your window. You can render your scene (and depth buffer) into an offscreen FBO, then copy to your window only at the end. For example:
glBindFramebuffer(GL_FRAMEBUFFER, fbo);
// TODO: Render scene
glBindFramebuffer(GL_FRAMEBUFFER, 0);

glBindFramebuffer(GL_READ_FRAMEBUFFER, fbo);
glBindFramebuffer(GL_DRAW_FRAMEBUFFER, 0); // default FBO
glBlitFramebuffer(
    0, 0, fboWidth, fboHeight,
    0, 0, windowWidth, windowHeight,
    GL_COLOR_BUFFER_BIT, GL_LINEAR);
glBindFramebuffer(GL_FRAMEBUFFER, 0);
With this approach, you can also be rendering your scene at a lower resolution than your window, since the call to glBlitFramebuffer will scale up your rendering. You might find this useful if you’re on a 4K display, but still want to render at a lower resolution for improved frame rate or battery power savings. This also saves you the trouble of creating a window in SRGB mode, which takes away further complexity from your window management code.
You can also use glBlitFramebuffer to convert a multi-sampled framebuffer into a single-sampled framebuffer, but you’re not allowed to do scaling simultaneously with resolving multi-samples in a call to glBlitFramebuffer, so you might have to call glBlitFramebuffer twice: Once to resolve multisamples, and once again to copy and scale up to your window. At this point, it might become interesting to do all this through a single fragment shader instead. You can simultaneously resolve and scale if you use the GL_EXT_framebuffer_multisample_blit_scaled extension (see: hardware supporting GL_EXT_framebuffer_multisample_blit_scaled).
Anyways, back to the whole Reversed-Z thing…
Step Three: Clear your Depth Buffer to Zero
With a normal depth test, you might have been clearing the depth buffer to 1, since that was the “far” value. When you call glClear(GL_DEPTH_BUFFER_BIT), it clears the depth buffer using the last set value of glClearDepth, which is 1 by default. On the other hand, with Reversed-Z, the “far” value is now 0, so you have to use the proper clear depth value:
glBindFramebuffer(GL_FRAMEBUFFER, fbo);

glClearDepth(0.0f);
glClear(GL_DEPTH_BUFFER_BIT);
Step Four: Flip your Depth Comparison to GREATER
As implied by its name, using Reversed-Z means that far depth values are represented by smaller numbers. That means you need to switch your glDepthFunc from GL_LESS to GL_GREATER, as shown in the code below. In this example code, I also reset the comparison and depth state back to OpenGL defaults, so the state doesn’t leak into other code that might not be doing Reversed-Z, or that might not be using depth testing.
glEnable(GL_DEPTH_TEST);
glDepthFunc(GL_GREATER);
// TODO: Draw your scene
glDepthFunc(GL_LESS);
glDisable(GL_DEPTH_TEST);
Step Five: Update your Projection Matrix
Reversed-Z requires a slightly different projection matrix than what (for example) gluPerspective creates. What follows is some code you can use to create this new projection matrix. It uses the “right-handed” coordinate system convention, meaning that the Z axis points out of your computer screen. Alternatively, that means the objects in front of your camera have a negative Z value in view space. This is the OpenGL convention.
Note that this matrix doesn’t only reverse the Z, it also sets the far plane to infinity, which works well for extremely large view distances. You can find the derivation of this matrix in the following article: http://dev.theomader.com/depth-precision/
glm::mat4 MakeInfReversedZProjRH(float fovY_radians, float aspectWbyH, float zNear)
{
    float f = 1.0f / tan(fovY_radians / 2.0f);
    return glm::mat4(
        f / aspectWbyH, 0.0f,  0.0f,  0.0f,
                  0.0f,    f,  0.0f,  0.0f,
                  0.0f, 0.0f,  0.0f, -1.0f,
                  0.0f, 0.0f, zNear,  0.0f);
}
You can call this code as follows:
glm::mat4 proj = MakeInfReversedZProjRH(glm::radians(70.0f), (float)width/height, 0.01f);

glUniformMatrix4fv(PROJECTION_MATRIX_LOCATION, 1, GL_FALSE, value_ptr(proj));
// TODO: glDraw*()
Note that I’m referring to the OpenGL Mathematics library “glm”, which by OpenGL convention uses column-major order for the arguments of its constructor. That means the first 4 inputs to the constructor are actually the first column of the matrix. Might be important if you’re translating to a different matrix library.
That’s it?
That’s it!
In Summary
- Set your depth clip conventions to [0,1] using glClipControl.
- Create and use a floating point depth buffer.
- Clear your depth buffer to 0 instead of the default of 1.
- Use GL_GREATER instead of GL_LESS for your depth test.
- Use a projection matrix that flips the depth.
What about DirectX?
There’s almost no difference in implementing this in DirectX. First, you don’t need glClipControl because the [0,1] convention is already the default in DirectX. Second, if you’re following DirectX conventions and using a “left-handed” convention for the view, then just turn the “-1” into “+1” in the projection matrix. You also need to do this in OpenGL if you’re using left-handed conventions, meaning that the camera’s Z axis goes into your screen, or equivalently that you consider objects to be in front of the camera if their Z value in view space is positive.

This is a brilliant post! I’ve read about this technique before but have never been sure of the exact nuts and bolts of implementing it. I’ll definitely be using it now! Thank you! 🙂
LikeLike
Nice writeup!
For completeness, calling glDepthRange(1.0, 0.0) is a neat alternative to flipping depth in the projection matrix.
LikeLiked by 1 person
yes,it is !But it does not improve any precison for object around far plane, it just exchanges the mapping result’s left and right value!
LikeLike
YES, your post is INDEED no-nonsense step by step guide.
LikeLike
Thank you very much for this no-nonsense guide! I’ve read the explanation of reversed depth so I know why it works, but I didn’t know how to actually achieve it in OGL. Also, thank you nopsleddriver 🙂
LikeLike
However,in my eyes,when you flip the projection matrix according to http://dev.theomader.com/depth-precision/, the link itself contains some detail errors when premultiplying the orginal projection mat,and also follow the idea of this link in opengl,when you used the flipped projection,its C and D are not ‘zero’ and ‘znear’,but are ‘zero’ and ‘2*znear’ when the far clip plane is infinity,and what’s more when you use this projection in rendering you’ll get a flipped scene from left to right.The correct path is that,when you open clip control’s depth mode to be zero_to_one,opengl will automatically reverse the depth for us according to depth range(depth range needn’t to be reversed),user need not to flip the normal project matrix’s C and D element ,that’s to say object around near clip plane will own greater depth value ,object around far clip plane will have less value,which is the main purpose that clip control is introduced in gl4.5.Welcome to talk about this with me further!
LikeLike
sorry for ignoring that you’ve passed the flipped projection mattrix as the uniform yourself!But,still the flipped projection mattrix is not correct completely in my eyes.
LikeLike
As you’ve passed the flipped projection mattrix as the uniform in vertShader,the clip control’s depth mode actually didn’t work at all,so your rendered scene is normal!
LikeLike
Can you summarize your three comments? I’m not sure if I’m following your train of thought.
LikeLike
i tried to wrap my head around the process of making InvZ matrices in general and couldn’t get the same results as theomader in “Standard Depth” and “Reverse Depth” sections. i plugged the matrices in octave and got this: https://goo.gl/X0RqXN. do you happen to know why the bottom row after the multiplication is the same as before it?
LikeLike
How would I read the depth value in a pixel/fragment shader in order to visualize the depth of a scene on screen?
LikeLike
I tries using this in DirectX 11. I wanted to render the depth of the scene by sampling the depth buffer. But the values within the depth buffer are very small. How do I normalize them to 0..1 in the pixel shader?
LikeLike
There’s a slight error in the usage of the updated projection matrix. Since the near plane now maps to 1, the zNear value should be close to but slightly less than 1. As it is right now, all z values are going to be mapped between 0.01 and 0 which is obviously suboptimal.
LikeLike
Very interesting and useful!
LikeLike